In this article, we will discuss how to send emails using a Template file in ASP.NET Core Application. Sending email using Template file is similar to sending emails using plain text. The only difference is that now, the source of the content is a text file rather than direct content for email.
If you don’t know how to send email in ASP.NET Core applications, please refer to my previous article Configure Email Service In ASP.NET Core Using MailKit. Let's assume, we have already configured email service in ASP.NET Core application.
Milestones
- Create a Simple Email Template.
- Configure Email Setting in ASP.NET Core Application.
- Read content from Email Template using StreamReader()
- Personalize Email Content
- Send Email to User
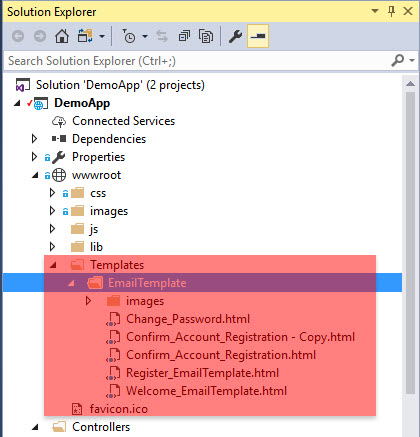
Creating a Simple Email TemplateWe will keep the template file separate so that we can change the file design and content anytime. Let's keep these template files under wwwroot => Templates => EmailTemplate.
Step 1
For this, create a new folder named Templates under wwwroot folder.
Step 2
Create a new folder named Email Template under Templates folder.
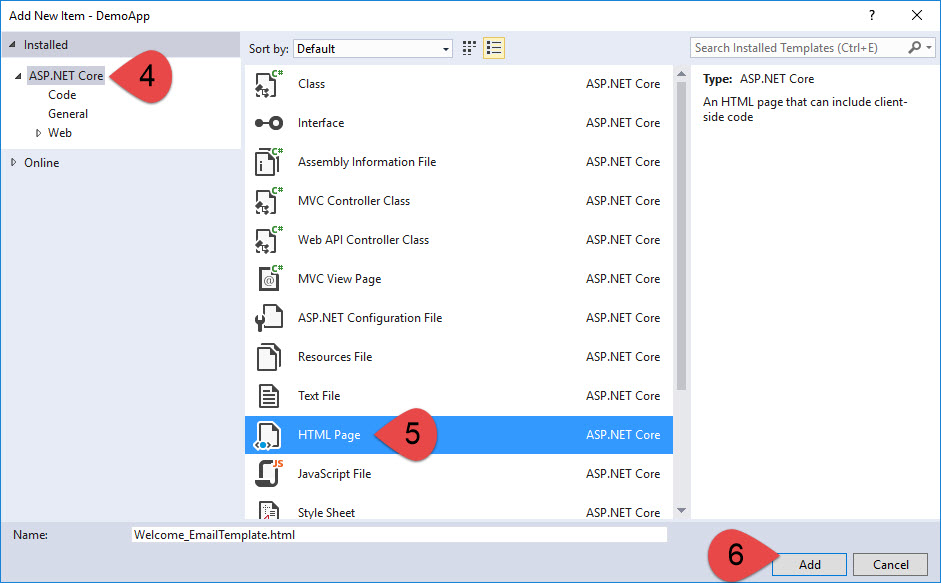
Step 3Add a new Item in Email Template (right click on Email Template folder >> add New Item).
Step 4Select ASP.NET Core and then HTML Page.
Step 5Set a name for the HTML file. In my case, I have named it as Welcome_EmailTemplate.html (But I will be usingConfirm_Account_Registration.htmlfor demo purposes whose design is the same with a different file name).

Once you have created Email Templates, the Solution Explorer looks like below. (In my case, there are 5 Email Templates)

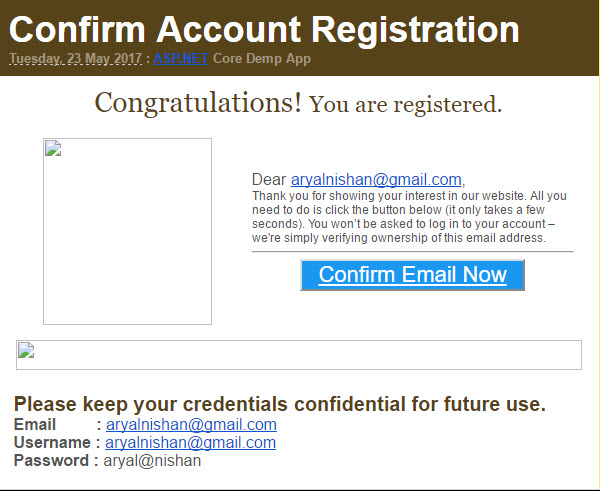
Now, you can write your own design codes using inline CSS and HTML to create Email. In my case, the template looks like this -

The code for the above sample Email Template is given below.
Code Snippet
- <htmlxmlns="http://www.w3.org/1999/xhtml">
- <head>
- <metahttp-equiv="Content-Type"content="text/html;charset=utf-8"/>
- <title>WelcomeEmailfromTCP</title>
- </head>
- <body>
- <tablewidth="100%"border="0"cellspacing="0"cellpadding="0">
- <tr>
- <tdalign="center"valign="top"bgcolor="#ffe77b"style="background-color:#ffe77b;">
- <br>
- <br>
- <tablewidth="600"border="0"cellspacing="0"cellpadding="0">
- <tr>
- <tdheight="70"align="left"valign="middle"></td>
- </tr>
- <tr>
- <tdalign="left"valign="top"><imgsrc="http://localhost:2131/Templates/EmailTemplate/images/top.png"width="600"height="13"style="display:block;"></td>
- </tr>
- <tr>
- <tdalign="left"valign="top"bgcolor="#564319"style="background-color:#564319;font-family:Arial,Helvetica,sans-serif;padding:10px;">
- <divstyle="font-size:36px;color:#ffffff;">
- <b>{0}</b>
- </div>
- <divstyle="font-size:13px;color:#a29881;">
- <b>{1}:ASP.NETCoreDempApp</b>
- </div>
- </td>
- </tr>
- <tr>
- <tdalign="left"valign="top"bgcolor="#ffffff"style="background-color:#ffffff;">
- <tablewidth="100%"border="0"cellspacing="0"cellpadding="0">
- <tr>
- <tdalign="center"valign="middle"style="padding:10px;color:#564319;font-size:28px;font-family:Georgia,'TimesNewRoman',Times,serif;">
- Congratulations!<small>Youareregistered.</small>
- </td>
- </tr>
- </table>
- <tablewidth="95%"border="0"align="center"cellpadding="0"cellspacing="0">
- <tr>
- <tdwidth="40%"align="center"valign="middle"style="padding:10px;">
- <imgsrc="http://localhost:2131/Templates/EmailTemplate/images/Weak_Password.gif"width="169"height="187"style="display:block">
- </td>
- <tdalign="left"valign="middle"style="color:#525252;font-family:Arial,Helvetica,sans-serif;padding:10px;">
- <divstyle="font-size:16px;">
- Dear{2},
- </div>
- <divstyle="font-size:12px;">
- Thankyouforshowingyourinterestinourwebsite.
- Allyouneedtodoisclickthebuttonbelow(itonlytakesafewseconds).
- Youwon’tbeaskedtologintoyouraccount–we'resimplyverifyingownershipofthisemailaddress.
- <hr>
- <center>
- <buttontype="button"title="ConfirmAccountRegistration"style="background:#1b97f1">
- <ahref="{6}"style="font-size:22px;padding:10px;color:#ffffff">
- ConfirmEmailNow
- </a>
- </button>
- </center>
- </div>
- </td>
- </tr>
- </table>
- <tablewidth="100%"border="0"cellspacing="0"cellpadding="0">
- <tr>
- <tdalign="center"valign="middle"style="padding:5px;">
- <imgsrc="http://localhost:2131/Templates/EmailTemplate/images/divider.gif"width="566"height="30">
- </td>
- </tr>
- </table>
- <tablewidth="100%"border="0"align="center"cellpadding="0"cellspacing="0"style="margin-bottom:15px;">
- <tr>
- <tdalign="left"valign="middle"style="padding:15px;font-family:Arial,Helvetica,sans-serif;">
- <divstyle="font-size:20px;color:#564319;">
- <b>Pleasekeepyourcredentialsconfidentialforfutureuse.</b>
- </div>
- <divstyle="font-size:16px;color:#525252;">
- <b>Email:</b>{2}
- <br/>
- <b>Username:</b>{3}
- <br/>
- <b>Password:</b>{4}
- </div>
- </td>
- </tr>
- </table>
- <tablewidth="100%"border="0"cellspacing="0"cellpadding="0"style="margin-bottom:10px;">
- <tr>
- <tdalign="left"valign="middle"style="padding:15px;background-color:#564319;font-family:Arial,Helvetica,sans-serif;">
- <divstyle="font-size:20px;color:#fff;">
- <b>Updateyourpasswordnow.</b>
- </div>
- <divstyle="font-size:13px;color:#ffe77b;">
- Weakpasswordsgetstolenandleadtohackedaccounts.CelebrateWorldPasswordDaywithanew,strongpassword.
- <br>
- <br>
- <ahref="#"style="color:#ffe77b;text-decoration:underline;">CLICKHERE</a>TOCHANGEPASSOWORD
- </div>
- </td>
- </tr>
- </table>
- <tablewidth="95%"border="0"align="center"cellpadding="0"cellspacing="0">
- <tr>
- <tdwidth="50%"align="left"valign="middle"style="padding:10px;">
- <tablewidth="75%"border="0"cellspacing="0"cellpadding="4">
- <tr>
- <tdalign="left"valign="top"style="font-family:Verdana,Geneva,sans-serif;font-size:14px;color:#000000;">
- <b>FollowUsOn</b>
- </td>
- </tr>
- <tr>
- <tdalign="left"valign="top"style="font-family:Verdana,Geneva,sans-serif;font-size:12px;color:#000000;">
- <tablewidth="100%"border="0"cellspacing="0"cellpadding="0">
- <tr>
- <tdwidth="33%"align="left"valign="middle">
- <ahref="https://twitter.com"title="Facebook">
- <imgsrc="http://localhost:2131/Templates/EmailTemplate/images/tweet48.png"width="48"height="48">
- </a>
- </td>
- <tdwidth="34%"align="left"valign="middle">
- <ahref="https://linkedin.com"title="Linkedin">
- <imgsrc="http://localhost:2131/Templates/EmailTemplate/images/in48.png"width="48"height="48">
- </a>
- </td>
- <tdwidth="33%"align="left"valign="middle">
- <ahref="https://facebook.com"title="Facebook">
- <imgsrc="http://localhost:2131/Templates/EmailTemplate/images/face48.png"width="48"height="48">
- </a>
- </td>
- </tr>
- </table>
- </td>
- </tr>
- </table>
- </td>
- <tdwidth="50%"align="left"valign="middle"style="color:#564319;font-size:11px;font-family:Arial,Helvetica,sans-serif;padding:10px;">
- <b>Hours:</b>Mon-Fri9:30-5:30,Sat.9:30-3:00,Sun.Closed<br>
- <b>CustomerSupport:</b><ahref="mailto:[emailprotected]"style="color:#564319;text-decoration:none;">[emailprotected]</a><br>
- <br>
- <b>CompanyAddress</b><br>
- CompanyURL:<ahref="http://www.yourcompanyname.com"target="_blank"style="color:#564319;text-decoration:none;">http://www.yourcompanyname.com</a>
- </td>
- </tr>
- </table>
- </td>
- </tr>
- <tr>
- <tdalign="left"valign="top"><imgsrc="http://localhost:2131/Templates/EmailTemplate/images/bot.png"width="600"height="37"style="display:block;"></td>
- </tr>
- </table>
- <br>
- <br>
- </td>
- </tr>
- </table>
- </body>
- </html>
Now, our Email Template is ready.
Scenario - I : Verifying User's Email Ownership on Registration
We need to send a confirmation email to verify the ownership of the email to the user, just after first registration with his/her email on our application.
The process is,
- Collect user details from Registration Form
- Register Method of Account Controller of type [HttpPost] creates a new user using the following code.
- //Take user details from Registration Form ie. model carries data from Registration form to here
- var user = new ApplicationUser { UserName = model.Email, Email = model.Email };
- //CreateAsync inside UserManager creates new user when userdetails and password supplied.
- var result = await _userManager.CreateAsync(user, model.Password);
- Generate unique code for new user details.
- var code = await _userManager.GenerateEmailConfirmationTokenAsync(user);
- A unique random callbackUrl is generated using the generated code and UserId.
- var callbackUrl = Url.Action(nameof(ConfirmEmail), "Account", new { userId = user.Id, code = code }, protocol: HttpContext.Request.Scheme);
- Send callbackUrl to the user via email.
- string Message = "Please confirm your account by clicking <a href=\"" + callbackUrl + "\">here</a>";
- //Send Email to User
- await _emailSender.SendEmailAsync(model.Email, subject, messageBody);
- When user clicks the send callback URL, he/she is sent back to the ConfirmEmail Method of Account Controller.
- //Find User Details by userId
- var user = await _userManager.FindByIdAsync(userId);
- if (user == null)
- {
- return View("Error");
- }
- var result = await _userManager.ConfirmEmailAsync(user, code);
- ViewData["Message"] = "Your email has been confirmed. Please Login now. ";
- ViewData["MessageValue"] = "1";
- This line will match the received user details and code via callbackUrl and sets ConfirmedEmail to true in database.
Now, during this process, if we want to send email using our custom Email Templates, we need to
- Read content of Email Template
- Read User Details received from User Registration Form.
- Pass User Details to contents of Email Template.
- Replace {0}, {1}, {2} with respective values.
- Send email to user. (Using Mail Kit for now)
Reading Contents from Template File Step 1
- privatereadonlyUserManager<ApplicationUser>_userManager;
- privatereadonlySignInManager<ApplicationUser>_signInManager;
- privatereadonlyIEmailSender_emailSender;
- privatereadonlyISmsSender_smsSender;
- privatereadonlyILogger_logger;
- privatereadonlystring_externalCookieScheme;
- privateIHostingEnvironment_env;
- publicAccountController(
- UserManager<ApplicationUser>userManager,
- SignInManager<ApplicationUser>signInManager,
- IOptions<IdentityCookieOptions>identityCookieOptions,
- IEmailSenderemailSender,
- ISmsSendersmsSender,
- ILoggerFactoryloggerFactory,
- IHostingEnvironmentenv)
- {
- _userManager=userManager;
- _signInManager=signInManager;
- _externalCookieScheme=identityCookieOptions.Value.ExternalCookieAuthenticationScheme;
- _emailSender=emailSender;
- _smsSender=smsSender;
- _logger=loggerFactory.CreateLogger<AccountController>();
- _env=env;
- }
Step 2get wwwroot Folder
- var webRoot = _env.WebRootPath; //get wwwroot Folder
Step 3Get TemplateFile located at wwwroot/Templates/EmailTemplate/Register_EmailTemplate.html
- //GetTemplateFilelocatedatwwwroot/Templates/EmailTemplate/Register_EmailTemplate.html
- varpathToFile=_env.WebRootPath
- +Path.DirectorySeparatorChar.ToString()
- +"Templates"
- +Path.DirectorySeparatorChar.ToString()
- +"EmailTemplate"
- +Path.DirectorySeparatorChar.ToString()
- +"Confirm_Account_Registration.html";
Step 4Initialie BoduBuilder()
- var builder = new BodyBuilder();
Step 5Read Content of Template file using StreamReader and append to BodyBuilder()
- using (StreamReader SourceReader = System.IO.File.OpenText(pathToFile))
- {
- builder.HtmlBody = SourceReader.ReadToEnd();
- }
Passing value and Formatting the Content of Template with Dynamic Values
Step 1use string.Format(format item, dynamic values as parameters) In our case, {x} values in Templates are to replace by dynamic values.
- //{0}:Subject
- //{1}:CurrentDateTime
- //{2}:Email
- //{3}:Username
- //{4}:Password
- //{5}:Message
- //{6}:callbackURL
Code Snippet
- stringmessageBody=string.Format(builder.HtmlBody,
- subject,
- String.Format("{0:dddd,dMMMMyyyy}",DateTime.Now),
- model.Email,
- model.Email,
- model.Password,
- Message,
- callbackUrl
- );
Send Email using MailkitIf you don’t know how to send email using Mail kit in ASP.NET Core Applications please refer to my previous blog. For now I am skipping setting up email service.
- await_emailSender.SendEmailAsync(model.Email,subject,messageBody);
- //SuccessMessageViewData["Message"]=$"Pleaseconfirmyouraccountbyclickingthislink:<ahref='{callbackUrl}'class='btnbtn-primary'>ConfirmationLink</a>";
- ViewData["MessageValue"]="1";
await _emailSender.SendEmailAsync(model.Email, subject, messageBody); line will send email to user email.
Code used in Register Method of Account Controller
- //POST:/Account/Register
- [HttpPost]
- [AllowAnonymous]
- [ValidateAntiForgeryToken]
- publicasyncTask<IActionResult>Register(RegisterViewModelmodel,stringreturnUrl=null)
- {
- ViewData["ReturnUrl"]=returnUrl;
- if(ModelState.IsValid)
- {
- varuser=newApplicationUser{UserName=model.Email,Email=model.Email};
- varresult=await_userManager.CreateAsync(user,model.Password);
- //varuser=await_userManager.FindByEmailAsync(model.Email);
- if(result.Succeeded)
- {
- //Sendanemailwiththislink
- varcode=await_userManager.GenerateEmailConfirmationTokenAsync(user);
- varcallbackUrl=Url.Action(nameof(ConfirmEmail),"Account",new{userId=user.Id,code=code},protocol:HttpContext.Request.Scheme);
- //EmailfromEmailTemplate
- stringMessage="Pleaseconfirmyouraccountbyclicking<ahref=\""+callbackUrl+"\">here</a>";
- //stringbody;
- varwebRoot=_env.WebRootPath;//getwwwrootFolder
- //GetTemplateFilelocatedatwwwroot/Templates/EmailTemplate/Register_EmailTemplate.html
- varpathToFile=_env.WebRootPath
- +Path.DirectorySeparatorChar.ToString()
- +"Templates"
- +Path.DirectorySeparatorChar.ToString()
- +"EmailTemplate"
- +Path.DirectorySeparatorChar.ToString()
- +"Confirm_Account_Registration.html";
- varsubject="ConfirmAccountRegistration";
- varbuilder=newBodyBuilder();
- using(StreamReaderSourceReader=System.IO.File.OpenText(pathToFile))
- {
- builder.HtmlBody=SourceReader.ReadToEnd();
- }
- //{0}:Subject
- //{1}:DateTime
- //{2}:Email
- //{3}:Username
- //{4}:Password
- //{5}:Message
- //{6}:callbackURL
- stringmessageBody=string.Format(builder.HtmlBody,
- subject,
- String.Format("{0:dddd,dMMMMyyyy}",DateTime.Now),
- model.Email,
- model.Email,
- model.Password,
- Message,
- callbackUrl
- );
- await_emailSender.SendEmailAsync(model.Email,subject,messageBody);
- ViewData["Message"]=$"Pleaseconfirmyouraccountbyclickingthislink:<ahref='{callbackUrl}'class='btnbtn-primary'>ConfirmationLink</a>";
- ViewData["MessageValue"]="1";
- _logger.LogInformation(3,"Usercreatedanewaccountwithpassword.");
- returnRedirectToLocal(returnUrl);
- }
- ViewData["Message"]=$"Errorcreatinguser.Pleasetryagainlater";
- ViewData["MessageValue"]="0";
- AddErrors(result);
- }
- //Ifwegotthisfar,somethingfailed,redisplayform
- returnView(model);
- }
Appplication Execution and Output
Step 1Now let's rebuild the soution and run the application.
Step 2
Lets register as a New user /Account/Register
Once we register as new user, a confirmation email is sent on the registred email. Upon checking the email inbox, we receive email like this -

We receive the personalized email sent from the Demo ASP.NET Core Application.
Scenerio where we need Email Templates
- Send personalized emails to all/selected users for events and news.
- Newsletter
- Notices and Call for events
- Welcome Email to New Users.
- Automatic Monthly report to Admins and Staffs.
- and many more....
SummarySo far, we have learned how to send personalized emails to users creating Email Templates .
You may also like
- How to configure Email Services in ASP.NET Core Applications.
- How to export data to Excel from Web API in ASP.NET Core using Kendo UI
- Sorting and Grouping in Kendo Grid using Web API in ASP.NET Core Application
- Call Web API Using JQuery AJAX In ASP.NET Core Web Applications
- How to create Image Thumbnail in ASP.NET Web Application